Loops
1. Introduction to the Loops
In this article, we will learn about the “for” and “while” loops in Kaholo.
Loops are especially useful when it comes to situations when we need to execute a block of code several times.
In general, a Kaholo loop consists of elements that have different purposes:
- Conditional Code
- Flow Control – Action Coordination
- Hooks – Executes any function before or after an Action is executed
- Links between actions that define the loop start and end points
Aside from connecting links, you can find all of these in the Advanced tab of the Action.
Conditional Code
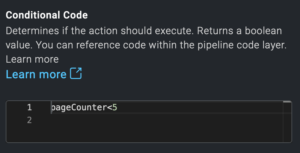
Each Action in Kaholo has a Conditional Code field in the Advanced tab. This controls whether the action executes or not. This field is also used in the context of controling loops. When applying a loop, we use this Conditional Code field to determine when to exit the loop. The condition is written in JavaScript syntax and if it evaluates to true, the loop will continue but if it’s false, the loop will end.
You can base the conditional expression on things like a previous action’s status, its final result payload, the Pipeline’s current configuration, or a function or variable on the Code page.
Flow Control – Action Coordination
Each Action has an Advanced tab in the Edit Panel where you can control the behavior of an action and its parameters for more advanced flow control.
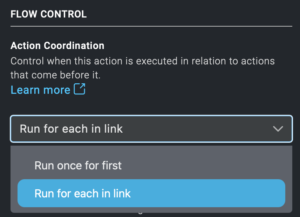
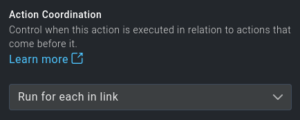
Action Coordination control when this action is executed in relation to actions that come before it.
- Run once for first – Will execute this action only once after any incoming action is completed
- Run for each in the link – Will execute this action for each action after any incoming action is completed. Required if you want to loop over something several times
Hooks
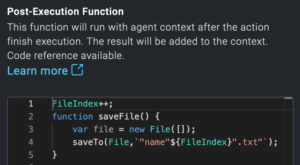
Loops very often use increment or decrement statements. You can define them in the Hooks section using the Post-Execution Function or Pre-Execution Function field.
For example, you want to get the data from an API and save it to 10 separate files. In this case, your loop should iterate 10 times and then stop, so you will not end up with more results than needed. To do that you can:
Use a Pre-Execution Function to create 10 separate files, where the data from each iteration will be stored.
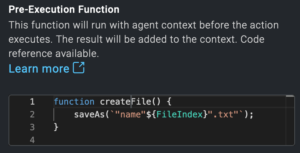
Use a Post-Execution Function to define a counter of the iterations, which will be incremented each time the loop executes. We’ll also use the iteration number to name the files accordingly.
The following code will increment the FileIndex counter as well as save the data from the API to a new file each time the loop executes.
To create a loop, start by dragging a line from the exit point of any Action to the entry point of either the Action itself or another Action that appears earlier in the Pipeline. The line determines the loop’s start and end points.
2.1 “For” loops
A For loop is used on a collection of items to iterate over a sequence like lists, types, dictionaries, sets, or even strings.
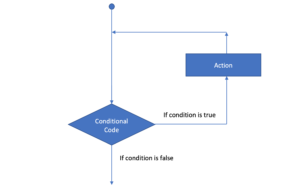
The flow diagram of the “For” loop looks as follows:
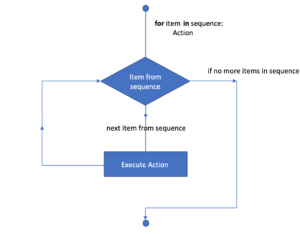
It takes the first item of the sequence, executes the actions, and moves on to the next item in the sequence until it reaches the last one at which point it exits the loop and continues to execute the subsequent actions.
2.2 Nested Loops and Multiple elements
You can also combine two or more loops.
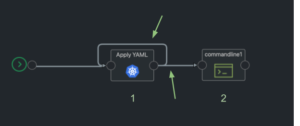
It is important to remember that loops work for each of the arrows coming out of the Action. Therefore, they are executed for both:
- the Action that is triggered (1) and
- the Action that follows it (2).
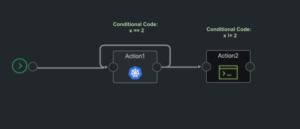
To prevent the Action (2) from being executed outside the loop, a Conditional Code field with an opposite condition value, to the Conditional Code specified in looping Action (1), should be defined.
For example, if in Action (1) the Conditional Code is x == 2 then in Action (2) we should define the Conditional Code as x != 2 to stop its execution and let the loop iterate to completion before moving on to executing the subsequent actions.
2.3 “While” loops
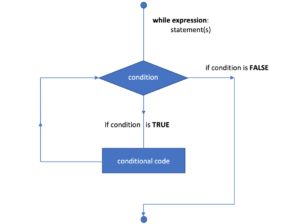
While loops continually execute a set of Actions as long as the given condition is satisfied (is TRUE). It first checks the condition and then executes the Action.
3. Loop Example: Creating Subnets from Configuration
In this example, there are JSON configurations that contain some number of subnets, ranging from one to a dozen, depending on the configuration. The Action must create one virtual subnet for each subnet listed in the configuration.
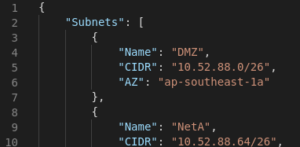
Kaholo exposes configuration in the JavaScript context, so the total number of subnets in the configuration is simply:
kaholo.execution.configuration.Subnets.length
In the Code page, we create a looping variable to represent the index in the array of subnets:
var subnetLoopVar = 0
In order to make the looping variable increment with each pass through the loop, we use a post-execution function. Later in the Pipeline, we’ll need the “subnetId” of the subnets created, so in the same function we stash that information in an array.
 function subnetPostExe() {
     stashedSubnetIds[subnetLoopVar] = kaholo.actions.createSubnet.result.createSubnet.Subnet.SubnetId;
     subnetLoopVar++;
 }
Next, in the Advanced configuration tab of the Action, you can configure it as follows:
Conditional Code:
subnetLoopVar < kaholo.execution.configuration.Subnets.length
Post-Execution Function:
subnetPostExe()
Action Coordination:
And then, to make the following Action trigger only when the loop is finished, you can do the following:
Conditional Code (for the following Action):
subnetLoopVar == kaholo.execution.configuration.Subnets.length
Finally, in the Action that creates subnets, the Parameters use the looping variable with the Configuration. For parameter “CIDR Block” you can use this:
kaholo.execution.configuration.Subnets[subnetLoopVar].CIDR
Loop Results
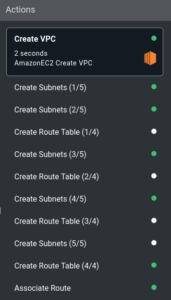
The Pipeline is now ready for execution. The results (see below) show that the flow control works as designed. This configuration has four subnets. The first three actions trigger the next action (Create Route Table). However, the Conditional Code is not satisfied, so the Action is skipped, as indicated by the white dots.
The route table got created only after the fourth pass of the loop. The Create Subnets Action is finally skipped on the fifth attempt because the looping is finished – the Configuration has only four subnets. Associate Route is then the final Action of the Pipeline.
4. Summary
As you can see, loops are a very useful tool. By simply dragging an arrow and setting conditions, you can control complex workflows.
They have many uses, you can use them to retrieve data from an API but also to perform a sequence of actions one after the other, to process data, or to wait for a specific status before executing subsequent actions (e.g. waiting for an EC2 instance to be running).